In this post, I would like to talk about my understanding of the server and client simulators in the JPOSEE project.
The reason, I am writing this article is because I have received several request from readers of my blog and users from the JPOS users groups about understanding how to get started with JPOS. So, I am attempting to see if my understanding can be useful to others who might be interested in improving their understanding of the JPOS library.
I wrote a post a while back on using JPOSEE in Netbeans. I hope people found that helpful. This post will focus on two modules that comes with the JPOSEE project.
They are the clientsimulator and the serversimulator. The client and server simulator modules are a good starting point when you want to use the JPOS library.
JPOSEE is the guys at jpos.org's way of implementing a framework around the JPOS library. Before you start with JPOS, it is best you read the JPOS guide.
Not only would you get familiar with the library, you would also be helping Alenjandro and the JPOS crew out so that we can all keep benefiting from this interesting project/work.
The first thing you would need to do is to check out JPOSEE from the subversion repository.
I have an older version.
URL: http://jposee.googlecode.com/svn/trunk Repository
Root: http://jposee.googlecode.com/svn Repository
UUID: 12794a80-bd30-0410-a029-31405052ec81
Revision: 445 Node
Kind: directory
Schedule: normal Last Changed
Author: arevilla Last Changed
Rev: 445 Last Changed
Date: 2011-12-17 16:17:48 -0600 (Sat, 17 Dec 2011)
Yes, I know I should update, but that tells you how long ago I worked with JPOS. I kind of miss working with it. In my last project/job, I created a JPOS testing simulator, kind of like SOAPUI.
It was a web application and a command line application. The web application was created out of a need I had. I did not like waiting for the POS device team to load the new firmware on to the devices when changes were made to our application because they took too long for my liking on their implementation.
So I created my own POS device as a web application to test our transaction engine/application. The command line application was an integration with The Grinder load testing framework.
This one was obvious, we needed to see how our application survived under high loads. Anyway, back to the main purpose of this post. After you check out JPOSEE, the project should look like this. Mine looks like the image below. I already added some files to it. Yours should look like the trunk.
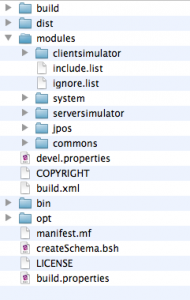
I copied the clientsimulator, serversimulator, and commons modules from the opt's directory into the modules directory. You should now be able to compile and run the application.
JPOSEE uses Ant, so you should be familiar with the build tool. ant compile ant run You should see a swing window pop up with lines simulating the client simulator sending ISO Messages to the server simulator. It is pretty quick, so look quickly. :) Now lets see what is really going on here. Lets take a look at the serversimulator/deploy directory.
We find a Qbean descriptor called 05_serversimulator.xml . You might be wondering what Qbeans are. I like to think of them as spring beans (if you are familiar with the spring framework).
Just like the spring container manages your objects as spring beans, I like to think that Q2 manages your Qbeans with its container. I call Q2's container the NameRegistrar.
If you are not familiar with spring, then I would just visualize Q2 as a club house that only allows Qbeans, to hang out at the VIP section and if anyone needs to talk to a Qbean, they need to check with the NameRegistrar to see if the Qbean is available. Process that information as long as you want and let me know if you get it (LOL).
Next, lets take a look at the server simulator's deployment descriptor file.
<?xml version="1.0" ?>
<server class="org.jpos.q2.iso.QServer"
        logger="Q2" name="simulator_10000">
  <attr name="port" type="java.lang.Integer">10000</attr>
  <channel class="org.jpos.iso.channel.XMLChannel"
           logger="Q2"
           packager="org.jpos.iso.packager.XMLPackager">
  </channel>
  <request-listener class="org.jpos.bsh.BSHRequestListener" logger="Q2">
  <property name="source" value="cfg/serversimulator.bsh" />
  </request-listener>
</server>
You can see that the file has several important xml attributes. The port, <channel/>, and the <request-listener/> elements.
The JPOS guide can explain these attributes better than I can, but I will give it a try. When it comes to JPOS development to me, I believe the most important thing is to understand the type of channel and packager both the client and server would be using first before doing anything else.
If you are familiar with Web Services, I like to think of the channel as a protocol like SOAP. And the packager would be a WSDL file.
The request listener element could be self explanatory. It is like a Web Service Endpoint. It basically waits for incoming request to the server on the port defined in the file.
<attr name="port" type="java.lang.Integer">10000</attr>
The request listener being used here is the org.jpos.bsh.BSHRequestListener class. It points to the cfg/serversimulator.bsh file. You should get familiar with bean shells if you want to know more about it.
message.setResponseMTI ();
Random random = new Random (System.currentTimeMillis());
message.set (37, Integer.toString(Math.abs(random.nextInt()) % 1000000));
message.set (38, Integer.toString(Math.abs(random.nextInt()) % 1000000));

if ("000000009999".equals (message.getString (4)))
      message.set (39, "01");
else
      message.set (39, "00");

source.send (message);
That is pretty much all about the serversimulator. Next, we can take a look at the clientsimulator/deploy directory.
This directory contains four files. They are :
 10_clientsimulator_channel.xml
 20_clientsimulator_mux.xml
 25_clientsimulator_ui.xml
 30_clientsimulator.xml
The numbers in front of the file name tells Q2 the order in which the Qbean descriptors should be loaded. The 10_clientsimulator_channel.xml file contains the channel information which are type of channel, the host, the port and the packager.
You should be able to see where this is going buy now. The 20_clientsimulator_mux.xml file contains the MUX configuration.
The recommended MUX implementation in the JPOS world is the QMUX. The MUX uses the channel to send and receive ISO Messages.
The 25_clientsimulator_ui.xml file is basically the swing app you see when you execute ant run command under the jposee directory.
The last file "30_clientsimualtor.xml," is the client simulator. It uses all the other qbeans to send/receive messages to/from the server simulator.
The file seems a little confusing I know, I got confused when I first took a look at it and the org.jpos.simulator.TestRunner file.
One thing you can do to get a good picture of how you can send messages to the server simulator and still keep your hair is to create your own client application and making sure the shutdown property in 30_clientsimulator.xml is set to false. Setting the shutdown flag to false would keep the server running. I will be using maven for this client application.
My pom file looks like this:
<project xmlns="http://maven.apache.org/POM/4.0.0" xmlns:xsi="http://www.w3.org/2001/XMLSchema-instance"
	xsi:schemaLocation="http://maven.apache.org/POM/4.0.0 http://maven.apache.org/maven-v4_0_0.xsd">
	<modelVersion>4.0.0</modelVersion>
	<groupId>jposclient</groupId>
	<artifactId>jposclient</artifactId>
	<packaging>war</packaging>
	<version>1.0</version>
	<name>jposclient Maven Webapp</name>
	<url>http://maven.apache.org</url>
	<repositories>
		<repository>
			<id>jpos</id>
			<name>jPOS Central Repository</name>
			<url> http://jpos.org/maven </url>
			<layout>default</layout>
		</repository>
	</repositories>
	<dependencies>
		<dependency>
			<groupId>junit</groupId>
			<artifactId>junit</artifactId>
			<version>4.10</version>
			<scope>test</scope>
		</dependency>
		<dependency>
			<groupId>org.jdom</groupId>
			<artifactId>jdom</artifactId>
			<version>1.1</version>
		</dependency>
		<dependency>
			<groupId>org.jpos</groupId>
			<artifactId>jpos</artifactId>
			<version>1.8.2</version>
		</dependency>
		<dependency>
			<groupId>javax.servlet</groupId>
			<artifactId>servlet-api</artifactId>
			<version>2.5</version>
			<scope>provided</scope>
		</dependency>
		<dependency>
			<groupId>javax.servlet.jsp</groupId>
			<artifactId>jsp-api</artifactId>
			<version>2.1</version>
			<scope>provided</scope>
		</dependency>
		<dependency>
			<groupId>javax.servlet</groupId>
			<artifactId>jstl</artifactId>
			<version>1.2</version>
		</dependency>
	</dependencies>
	<build>
		<finalName>jposclient</finalName>
	</build>
</project>
Then I added a qbean descriptor that I called channel manager(25_jposclient_channel_manager.xml).
<qbean name="manager" logger="Q2" realm="jpos-client-simulator"
	class="org.jpos.client.channel.ChannelManager">
	<property name="mux" value="jpos-client-mux" />
	<property name="channel" value="jpos-client-adaptor" />
	<property name="timeout" value="30000" />
	<property name="sessions" value="1" />
	<property name="shutdown" value="false" />
</qbean>
The actual java file looks like this:
package org.jpos.client.channel;

import org.jpos.iso.ISOException;
import org.jpos.iso.ISOMsg;
import org.jpos.iso.MUX;
import org.jpos.q2.QBeanSupport;
import org.jpos.util.NameRegistrar;

/**
 * Created with IntelliJ IDEA.
 * User: ouwaifo
 * Date: 6/7/12
 * Time: 1:41 PM
 * To change this template use File | Settings | File Templates.
 */
public class ChannelManager  extends QBeanSupport {

    private long MAX_TIME_OUT;
    private MUX mux;

    @Override
    protected void initService() throws ISOException {
        log.info ("initializing ChannelManager Service");
        try {
            mux = (MUX) NameRegistrar.get("mux." + cfg.get("mux"));
            MAX_TIME_OUT = cfg.getLong("timeout");
            NameRegistrar.register ("manager", this);
        } catch (NameRegistrar.NotFoundException e){
            log.error("Error in initializing service :"+ e.getMessage());
        }

    }

    public ISOMsg sendMsg(ISOMsg m) throws Exception{
        return sendMsg(m, mux, MAX_TIME_OUT);
    }

    private  ISOMsg sendMsg(ISOMsg msg, MUX mux, long time)
            throws Exception
    {

        if (mux != null)
        {
            long start = System.currentTimeMillis();
            ISOMsg respMsg = mux.request(msg,time);
            long duration = System.currentTimeMillis() - start;
            log.info("Response time (ms):"+ duration);
            return respMsg;
        }
        return null;
    }

}
I copied some of the deployment descriptors from the client simulator. 00_logger.xml file was copied as it is(no changes). 10_clientsimulator_channel.xml looks like this:
<?xml version="1.0" ?>
<channel-adaptor name='jpos-client-adaptor' class="org.jpos.q2.iso.ChannelAdaptor"
	logger="Q2">
	<channel class="org.jpos.iso.channel.XMLChannel" logger="Q2"
		packager="org.jpos.iso.packager.XMLPackager">
		<property name="host" value="127.0.0.1" />
		<property name="port" value="10000" />
	</channel>
	<in>jpos-client-send</in>
	<out>jpos-client-receive</out>
	<reconnect-delay>10000</reconnect-delay>
</channel-adaptor>
20_clientsimulator_mux.xml looks like this :
<?xml version="1.0" ?>
<mux class="org.jpos.q2.iso.QMUX"
     logger="Q2" name="jpos-client-mux">
 <in>jpos-client-receive</in>
 <out>jpos-client-send</out>
 <unhandled>jpos-client-unhandled</unhandled>
</mux>
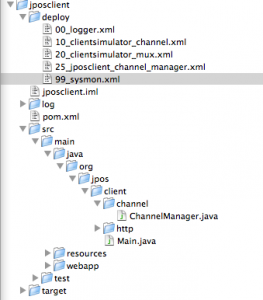
I did not make any changes to 99_sysmon.xml. My directory structure looks like this:
A deeper look:
The Main.java file :
package org.jpos.client;

import org.jpos.client.channel.ChannelManager;
import org.jpos.iso.*;
import org.jpos.q2.Q2;
import org.jpos.util.LogEvent;
import org.jpos.util.Logger;
import org.jpos.util.NameRegistrar;
import java.util.Date;

/**
 * * Created with IntelliJ IDEA. * User: ouwaifo * Date: 6/7/12 * Time: 1:51 PM
 * * To change this template use File | Settings | File Templates.
 */
public class Main {
	static void start() {
		Q2 q2 = new Q2();
		q2.start();
	}

	public static void main(String[] args) throws ISOException {
		start();
		ISOUtil.sleep(5000);
		new Thread(new Exec()).start();
	}

	static class Exec implements Runnable {
		ChannelManager channelManager;

		Exec() throws ISOException {
			try {
				channelManager = ((ChannelManager) NameRegistrar.get("manager"));
			} catch (NameRegistrar.NotFoundException e) {
				LogEvent evt = channelManager.getLog().createError();
				evt.addMessage(e);
				evt.addMessage(NameRegistrar.getInstance());
				Logger.log(evt);
			} catch (Throwable t) {
				channelManager.getLog().error(t);
			}
		}

		private ISOMsg createHandshakeISOMsg() throws ISOException {
			ISOMsg m = new ISOMsg();
			m.setMTI("0800");
			m.set(7, ISODate.getDateTime(new Date()));
			m.set(11, String.valueOf(System.currentTimeMillis() % 1000000));
			m.set(32, "00001603307");
			m.set(41, "T1603307");
			m.set(70, "301");
			return m;
		}

		private void sendHandShake() throws Exception {
			try {
				channelManager.sendMsg(createHandshakeISOMsg());
				channelManager.getLog().info("Handshake sent! ");
			} catch (ISOException e1) {
				channelManager.getLog().error(
						"ISOException :" + e1.getMessage());
			} catch (Exception e) {
				channelManager.getLog().error("Exception :" + e.getMessage());
			}
		}

		@Override
		public void run() {
			while (true) {
				ISOUtil.sleep(10000);
				try {
					sendHandShake();
				} catch (Exception e) {
					e.printStackTrace();
				}
			}
		}
	}
}
The Main.java file has a class called Exec that is a runnable object and would send ISO Messages to the server simulator every 10 seconds.
To test this application, you can start JPOSEE as you did earlier. Next, you should execute the main method in the Main class from your IDE or the command line.
mvn exec:java -Dexec.mainClass="org.jpos.client.Main"
You should now see both your client application and the server simulator communicating. I hope this article would ease the ability of you using the JPOS library in your applications.